Hi friends,
In the previous post under Creating WordPress(WP) Website, we learnt the differences in two ways to create a WP website through the WordPress.org and the WordPress.com. In this post, we'll learn to install a local web server on our system and install our WordPress site on the same.
We will use the Apache server provided by XAMPP as our local server. XAMPP is the most popular PHP development environment. The reason to use XAMPP is it is a completely free and easy to install Apache distribution. You can download the XAMPP application based on your system configuration from here. After downloading, just double click and install the software by following the instructions appearing during the installation process.
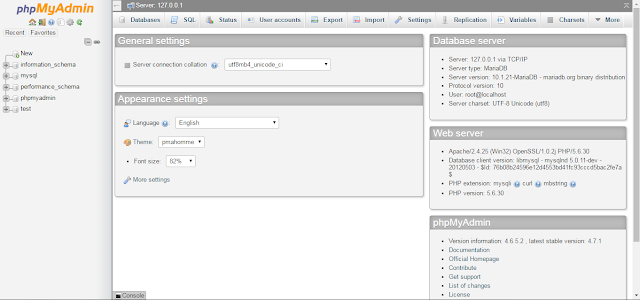
Next, go to the link to see if you get the following page:
In case you get the following error:
access denied for user 'root'@'localhost' (using password no)
Open the file config.inc.php present at the location:
and change the content pointed below to any password of your choice.
Now, if you again try to access this link, it will open the page shown above and we can proceed with installing WordPress.
Next, you need to download the WordPress application to your computer by going to WordPress Home Page and clicking Download WordPress button. This will download the latest version of the WordPress. Next, extract the zipped folder and place the extracted folder(I have renamed it to wordpress) to the following location:
Next, open the link replacing the wordpress (my extracted folder name) part of the link to the name of your extracted folder. After which, it'll ask for a couple of more inputs and then open the following
page:
It is preferred to do this step manually and not depending on the automated setup since it often results in problems. To do so, first we create a database for our website by opening the phpmyadmin page in our local server. Click on Databases tab present on this page and next create a database for our WP website. I have named my database as wordpress. You can name anything you wish provided it is not already present in the server.
After this step, we need to make one more change before we can go back to the page shown above. For this step, open the file wp-config-sample.php present at the location C:\xampp\htdocs\wordpress and make the following changes:
- Replace the database_name_here to the database named created in the previous step
- Replace the username_here to root
- Replace the password here to the password set earlier in this post
Finally, save and rename the file wp-config-sample.php to wp-config.php and refresh the page shown above. It will open the following page:
Next, fill all the necessary information and click Install WordPress button. Finally, we have installed our WordPress website in our system. From the next post, we'll start customizing the website to make it more appealing and user-friendly.


nice blog, MEAN Stack Development Course in Pune
ReplyDelete