Showing posts with label wordpress. Show all posts

Saturday, 15 July 2017

Creating WordPress(WP) Website - 10 Add Contact Us Page

Hi friends,

Welcome to the final post on Creating WordPress(WP) Website tutorials. In the previous post, we learnt to create the Photo Gallery Page of our WP website where we learnt to add an Image gallery to our website with several images added to that. In this post, we will learn to create the Contact Us page of our website. 

So, let's begin editing the Contact Us page we created earlier. To do so, go to the Pages link present in the Dashboard and click Edit link under the Contact Us page.

We will add a form and a Google Maps map in our Contact Us page and for that it's better to use the Page Builder option instead of writing the HTML code by ourselves. So, click on the Page Builder option to open the Page Builder widget.


We will add two rows to the Contact Us page . So click on Add Row and set the Set row layout value to 3 for the first row. Similarly, add another row and set the Set row layout value to 2 for this row. In the first row, we will add the Contact Info, the Office Hours and the Location of our workplace. In the next row, we will add a contact form in the first column and a Google Maps map in the other.


So, let's begin editing the rows. Select the first cell of the first row and click Add Widget and add a Visual Editor and click Edit to start editing the Visual Editor.


Add the following content to the Visual Editor and align in center and click Done.


Similarly, add the Visual Editor for the next two cells of the first row and Office Hours and Location to the second and third cell respectively.


Next, we will learn to add a contact form to our page. To do so, go to the Contact Forms link present under Contact link on the Dashboard.


Now, select and copy the Shortcode present beside the Contact Form 1.


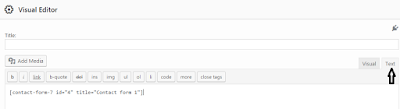
Again, go back to the Pages link and click Edit link under the Contact Us page and add the Visual Editor to the first cell of the second row by selecting it and clicking Add Widget button. Next, paste the copied text above to the Text tab of the Visual Editor and click Done.

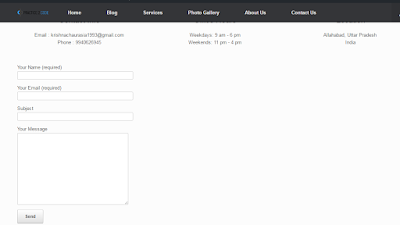
Now, if you click Update and refresh the Contact Us page again, you can see the contact form on the page:

Finally, we will learn to add a Google Maps map to our Contact Us page. To do so, first add a Text widget to the second cell of the second row by clicking Add Widget and selecting a Text widget.


Next, go to the Google Maps website and search for a location of your choice and then click Share link.


Click on the Embed Map tab on the popup and select the Custom size from the Drop down menu and set the size to 700 x 450.


Copy the generated code in the text box and go back to the Text widget in the Contact Us edit page and click Edit. Next, paste the copied code to the Text tab of the Edit widget and click Done.


Finally, click Update and refresh the Contact Us page to see the Google Maps map present beside the contact form.


With this, we finish this post as well as the tutorials under the heading Creating WordPress(WP) Website. Hope you enjoyed the posts and created your own WP website.  
Share:

Creating WordPress(WP) Website - 9 Creating Photo Gallery Page

Hi friends,

In the previous post under Creating WordPress(WP) Website, we learnt to add posts to the Blog page and also create thumbnails of the posts. In this post, we will learn to add photos to the Photo Gallery page of our WP website. 

Let's start editing our Photo Gallery Page. To do so, click on the Pages link present on the Dashboard of your WP website and click Edit link under the Photo Gallery page on the following page.


Next, click the Add Media button on the following page.


Now, click Create Gallery link on the following popup and browse and upload images to the website and finally click the Create a new gallery button.


Select the Size as Medium from the drop down menu in the following popup and click Insert Gallery button. 


We can also add the caption in each of the gallery images by just editing the text Caption this image under each image of the gallery. 


Click Update to make sure the changes are made to the website. Finally, go to the Photo Gallery page of the website to see the photos added to the gallery. The sizes of the images may not be in sync with each other and may look weird so it's better to first resize each image to the same size using an image editor and then upload the images. 

And that's it for this post on creating Photo Gallery page. The next post will be the final post under Creating WordPress(WP) Website tutorials where we will learn to create the Contact Us page and also embed a Google Maps map in that.
Share:

Creating WordPress(WP) Website - 6 Adding the Home Page

Hi friends,

In the previous post under Creating WordPress(WP) Website tutorials, we added various important pages to our WP website. In this post, we will learn to add the most important page i.e. the Home Page to our WP website. The Home Page is the page where the user lands by opening your website link. This is the current Home Page of our WP website:


To go to the Home Page, open the Dashboard of the website, hover over the Appearance Link and click Home Page link as shown by the below image:


There might be some already existing contents available on our Home Page which we don't need. So we now delete those contents present on the Home Page by clicking on the Delete this row button available under the Settings icon beside each content as shown below:


Apply the above action for each of the content present on your website's Home Page.

Now, we add several rows to add contents to our Home Page. Click on Add Row button available on the same page as shown in the below figure:


Add a row by setting Set Row Layout value as 1 and clicking the Insert button available at the bottom right as shown below:


Add two more rows in the same manner with Set Row Layout values as 3 and 2 respectively. After adding the three rows, the page will appear something like shown below:


Now, will add widgets to the rows. To do so, select the first row by clicking on it and then click Add Widget button present on the left of the Add Row button. This will open a popup with a list of widgets to add from. Add the Vantage Headline Widget to the first row and click on Edit button shown by the below image to edit the Headline. Next, add the Headline and click Done button on the popup that appears.


Next, we will add the Circle Icon to each of the items of the second row. Apply the same steps as above and add the Circle Icon to each item of the second row.

Now, click on Edit of the first Circle Icon of the second row and add the following contents:

  1. Enter Title
  2. Enter Text
  3. Change Icon to whatever you like
  4. More URL (/services for now)


After editing the contents, click Done followed by Save Home Page and then go to the Home Page to see the changes. It will appear something as below:


Clicking on More Info link in the above page will take you to the Services page of our website. If it does not, then you need to make the following settings to your website. Go to the Dashboard, hover over the Settings link and click on Permalinks link.


Select the Post name radio button and click Save Changes.


Now, refresh the Home Page and again click More Info link as done above. This should now open the Services page of your website.

Do the same thing for the other two Circle Icons as well.

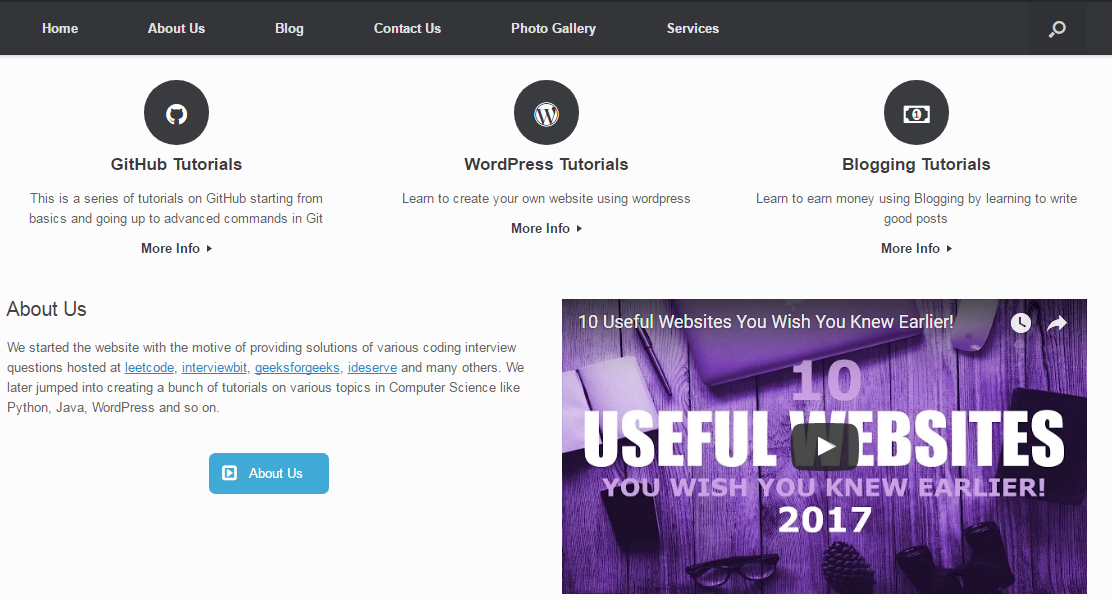
Now, we will edit the third row of our Home Page. We'll add a text post along with a button and a video on our Home Page. To add the text post, select the first part of the third row and click Add Widget and add a Text Widget followed by the SiteOrigin button. It should appear like the one below:


Next, click on Edit button over the Text widget and add some contents to the text widget. Do the same for the SiteOrigin button as well and customize the button as you like based on the options available. After the update, your Home Page should look something like the image below:


Next, we'll learn to add a video to our website. To do so, add the SiteOrigin Slider widget to the right portion of the third row and click Edit. In the popup window, click on Add button under the Slider frames label followed by the little drop down arrow icon shown as in the below image:


Next, click the Add button under the Background videos label and again click the drop down arrow icon present beside the Video label. You can add a video either by uploading from your system or by providing a URL. I have added a youtube video on my website. Once, you have added the video, click Done followed by Save Home Page.

If you refresh the Home Page again, Voila!, you'll see a video added to your website.


Now, we'll add the Social Media widget at the footer of our website. We have already seen how to install the Social Media plugin in our website in this post. To add a widget, go to the Dashboard followed by Widgets under the Appearance link present on the Dashboard page. Scroll down on the Widgets page and click on Social Media Widget and select Footer and then click Add Widget button. 


Next, click on Social Networking and add the appropriate links for the various social media websites and click Save.


If we again refresh our website Home Page (or any other page), we can see the various social media icons present at the footer of our website.


With this, we also end this post here about Adding the Home Page to our WP website. In the next post, we will learn how to change the logo and slider image of our website.
Share:

Creating WordPress(WP) Website - 3 Changing the WP Theme

Hi friends,

In the previous post under Creating WordPress(WP) Website, we learnt to install a WordPress website on our local web server. From this post onward, we will start learning how to customize the site as per our requirements. So, let's begin with the customization of our WordPress website. 

The first thing we learn is how to change is the Theme of our WP website. The theme of a website is the layout of the website which represents what content of the website goes at which position. One such example of the position of the content on the website includes whether the latest news appears at the left or right of the main content. 

So, let's begin changing the theme of our WP website. To do the same, first go to the website we created in the previous post using this link and login using the credentials set in the previous post. You'll see the following page if you are successfully logged into our WP website:


To change the theme of our website, click on the change your theme completely link below the Customize Your Site button as marked in above image. It will open another page with the list of already installed themes. To add a new theme our WP website, Click on Add New button where it will show the list of all the WP themes. I will use the 'Vantage' theme for my WP website. However, you can use any theme of your choice. Click the Install button shown over a theme to add it to the list of installed themes. We need to activate it next in order to apply it to our WP website. 


If the selected theme is installed properly, you can see the updated website with the selected theme by opening our WP website link in another browser tab.

That's it for this post about how to change the theme of a WordPress website. We'll learn to add plugins to our website in our next post under Creating WordPress(WP) Website tutorials. 
Share:

Creating WordPress(WP) Website - 4 Installing WP Plugins

Hi friends,

In the previous post under the topic Creating WordPress(WP) Website, we learnt how to change the Theme of a WP website. In this post, we'll see what plugins are and how to install them in our WP website.

So, let's first understand what plugins actually are.


plugin (or plug-inadd-on) is a software component that adds a specific feature to an existing computer program. When a program supports plugins, it enables customization [Wiki].

Any changes to the WP website is done through the Dashboard page of the website. To open the Dashboard page of our WP website, go to this link. It'll open the following page:


To see the list of installed plugins on your WordPress website, go to the Dashboard page and click on the Plugins link as marked in the below image:


This will list all the plugins that are by default installed in your WP website. Before beginning to install new plugins select and delete all the by default installed plugins as we do not need them. This will let the website load faster. 

Now, we see how to install additional plugins to enhance our website design. To install a plugin, click on Add New button on the Plugins page shown below.


The first plugin we will install on our WP website is the Black Studio TinyMCE WidgetThe Black Studio TinyMCE plugin adds a new Visual Editor widget type that allows you to insert rich text and media objects in your sidebars with no hassle. The default WordPress text widget lacks of functionalities and it requires HTML knowledge, this plugin was born to overcome these limitations. You can see various additional features supported by the Plugin from this link. Click Install Now and then Activate to activate in your WP website. 


Next, we install a plugin to add a contact form for your website. The plugin for the same is Contact Form 7. Search for the same and install and activate just like the above one. 

Now, we install a slider plugin named Meta SliderMeta Slider gives you the power to create beautiful slideshows on your WordPress site, through the most simple and intuitive plugin interface of any WordPress slider. Install and Activate it the same way as above. 

Next, we install and activate the SiteOrigins Widgets Bundle Plugin to our website. This is a very important plugin as it provides a collection of widgets that we can use and customize. All the widgets are built on a powerful framework, giving us advanced forms, unlimited colors and 1500+ icons. 

Next, install the Social Media Widget plugin to add links to various social media profiles in your WP website. 

Finally, install and activate the Site Origin Page Builder plugin to your WP website. 

That's all for this post on how to install WP plugins. We have installed a list of plugins to our WP website and good to go with adding the contents to the website. We will learn to create new pages and add contents in our website in the next post.
Share:

Creating WordPress(WP) Website - 5 Adding New Pages

Hi friends,

Welcome to the fifth post under Creating WordPress (WP) Website. In the previous post, we learnt how to install plugins to our WP website and also installed several important plugins in our website. In this post, we will see how to create new pages in our WP website so that we can add contents to them later on. 

To open the list of pages present in your WP website, click on Pages link available on the Dashboard as marked in the figure below:


We can see a Sample page already present in our WP website. Select and delete the same as we don't need it in our website. Now, we add various important pages for our website. To add a page, to our WP website, we click Add New button present beside the Pages label on the Pages link opened above as shown below:


Clicking the Add New button shown above will open another page asking you to enter the title of the page you want to add. After entering the title (say Blog), just click Publish button as shown in the below image to add the page to your WP website.


After publishing the Blog page. Click Add New and add the following pages to your WP website for now using the above steps:
  1. Contact Us
  2. About Us
  3. Photo Gallery
  4. Services
Once, you have created the pages, hover over the link at the top left of your WP website as marked in the below image and click on Visit Site link which will open the home page of your WP website with the above pages added above visible to your website as shown below.


Now that we have add the relevant pages to our website, we will start adding the contents to the Pages from the next post under Creating WordPress (WP) Website
Share:

Creating WordPress(WP) Website - 7 Changing Logo and Slider Image

Hi friends,

In the previous post under Creating WordPress(WP) Website tutorials, we learnt to customize the Home Page of our WP website where we add different widgets to our Home Page. In this post, we will learn how to change the logo and slider image of our website.

First of all, you need to have a logo for your website. You can create one using the LogoMakr website. I already have one for my website. 

Now that we have our logo, let's begin changing the same. To change the logo, go to the Dashboard followed by Customize Your Site. In the next page, click on Theme Settings followed by Logo. Next, select the logo file and upload it to your website. Do Save & Publish to update your website. Your website should appear something like this:


However, this does not look very good and we would like our logo to fit beside the Home Link. So, to achieve the same, again go to Theme Settings and click Layout. In the layout settings, change the Masthead Layout from Default Masthead to Logo In Menu and click Save & Publish. Refresh the website again and you'll see the logo appear beside the Home page link in the navigation menu something similar to shown below:


Next, we'll learn how to change the images of the slider present on the Home Page of our website. To do so, go to the Meta Slider link present on your Dashboard and click Create your first slideshow button.


Now, click Add Slide and then Upload Files to add to your image slider. After adding the files, select the uploaded files and click the Add to Slider button.


Finally, click the Save or Save & Preview to add the slider to our WP website. However, we won't be able to see the added Image Slider yet in our website since we have not yet added the slider to the Home Page of our website. To add the Image Slider to the Home Page, go the Pages link present on the Dashboard and click Edit link present below the Home Page


Scroll down on the Home Edit Page and select the newly created slider from the drop down menu and finally press Update button. 


Now, if you refresh the website again, you can see the website with updated slider with your latest added images. 


We also end this post here. In the next post, we will learn to add posts to our WP website. 
Share:

Contact Me

Name

Email *

Message *

Popular Posts