Showing posts with label jupyter notebook. Show all posts

Sunday, 16 July 2017

Data Science & Machine Learning - 2.3 Python Basics with Jupyter Notebook

Hi friends,

In the previous post under Data Science & Machine Learning, we reviewed the various data structures supported by Python programming language. In this post, we'll see the conditional statements, various loops, user-defined methods and much more. 

Note: All the commands discussed below are run in the Jupyter Notebook environment. See this post on Jupyter Notebook to know about it in detail. 


Python Basics 2

So, let's begin with the conditional operators first.


Now, we see the conditional statements which use the conditional operators discussed above.


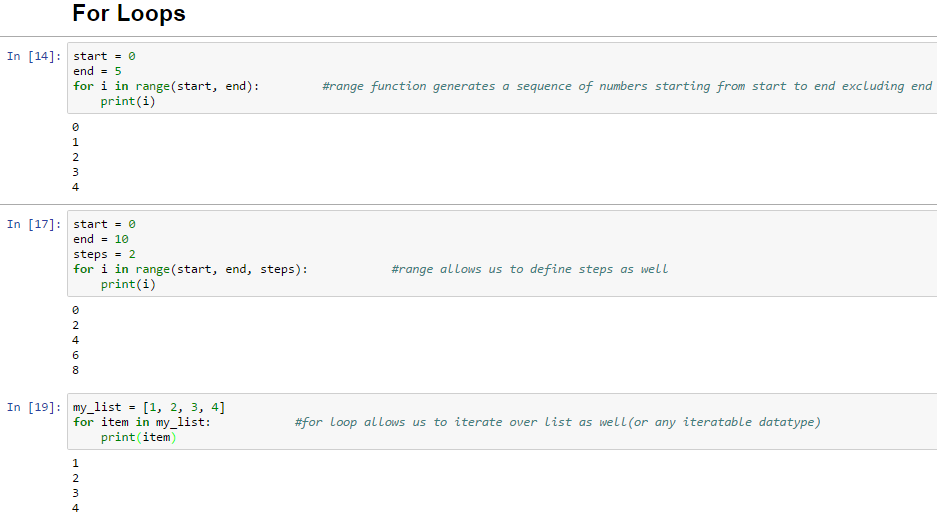
Now, we see the various loops supported by Python. 
For loops:
While loops:

Now, we see user defined methods in Python.


We can avoid the for loop to achieve the same on a list using the map function supported by Python. What it basically does is maps each element of the list x to the function my_square.


We now discuss Lambda Expression supported by Python. Lambda expressions avoid the need to write the functions separately and then calling with map. Below is a sample example. Lambda expressions are used a lot while learning data science libraries.


That's it for this post friends. We also end the overview of Python programming language with this post. Now that we have reviewed the Python syntax using Jupyter Notebook, we are good to go ahead with Data Science libraries from the next post.
Share:

Saturday, 15 July 2017

Data Science & Machine Learning - 2.2 Python Basics with Jupyter Notebook

Hi friends,

In this post under Data Science & Machine Learning, we'll see on overview of Python programming language. Keep in mind, it is just to refresh the python syntax and not to learn the Python programming language from scratch. If you are new to Python, I recommend you to first learn Python and then continue with these tutorials on Data Science & Machine Learning. In the previous post, we discussed an overview of working with Jupyter Notebook.

Note: All the commands discussed below are run in the Jupyter Notebook environment. See this post on Jupyter Notebook to know about it in detail.

So, let's begin with the Python overview.

Python Basics

First, we see the built-in data types in Python.
  1. Integers/Floats
  2. We can also assign the values to the variables using assignment operator =.  

  3. Strings

  4. Lists: The list type is a data structure that holds a number of objects in a given order


  5. Tuples:  These are immutable lists in Python


  6. Dictionaries: Dictionaries are unordered key-value pairs.

That's all for this post on basic data structures in Python. In the next post, we'll discuss the various loops, relational operators, methods and other advance topics in Python.
Share:

Friday, 14 July 2017

Data Science & Machine Learning - 2.1 Python Basics with Jupyter Notebook

Hi friends,

In the previous post under Data Science & Machine Learning, we discussed the installation process of Jupyter Notebook. In this post, we’ll walk through with Jupyter Notebook and basic Python syntax to get refreshed with Python basics.

As already discussed in the previous post, we can open the Jupyter notebook by typing jupyter notebook in the command prompt. It will open a tab with Jupyter Notebook in your browser appearing like one below:


Python Basics with Jupyter

Click on the Python 3 (or whatever Python version it is showing for you) on the tab and it'll open a blank Jupyter Notebook for you to start coding. We'll go through the following concepts to brush our Python basics in the next post:
  • We first see the following Data types in Python:
    • Integer/Float
    • String
    • List
    • Dictionary
    • Boolean
    • Tuple
    • Set
  • Then, we see the Conditional Statements:
    • if, elif, else statements
  • Next, we go over the loops:
    • for loops
    • while loops
    • range() loops
  • We'll then learn to write user defined functions in Python followed by lambda expressions, use built-in Python methods and so on.
Once you have opened a blank Python Jupyter notebook, you can start writing your python code and executing them.  To run a python code, write the code in a Jupyter cell and press the run button as shown below:


You can also run a Jupyter cell by pressing Shift + Enter while your cursor is present in the current Jupyter Notebook cell. You can save you current Jupyter Notebook script by either Ctrl + S or by pressing Save button shown above. You can also download you current Jupyter Notebook script in various formats by following the below step:


You can learn about the Jupyter keyboard shortcuts by clicking on the Help button followed by the Keyboard Shortcuts. Now that we have learnt to work with Jupyter Notebook, we are good to go ahead with the above listed Python topics from the next post.
Share:

Data Science & Machine Learning - 1 Installation Process

Hi friends,

Welcome to another post under Data Science & Machine Learning. In the previous post, we discussed an overview of what all things we are going to learn through the series of posts under Data Science & Machine Learning. In this post, we’ll go through the installation process of Python and Jupyter Notebook.

We’ll use the latest Python 3 version provided by the Anaconda distribution. Anaconda is the leading open data science platform powered by Python. The open source version of Anaconda is a high performance distribution of Python and R and includes over 100 of the most popular Python, R and Scala packages for data science.

For doing the programming in Python, we’ll be using the Jupyter Notebook. You are however allowed to use any of your favorite python editors such as PyCharm or any other text editor. The Jupyter Notebook is an open-source web application that allows you to create documents that contain live code, equations, visualizations and explanatory text. Uses include: data cleaning and transformation, numerical simulation, statistical modeling, machine learning and much more.

Installation Process

Now, we head over to the installation process of the Jupyter Notebook. The installation process of Jupyter through Anaconda distribution includes installation of both latest Python 3 version and Jupyter Notebook. The installation can be done through the following link.

You need to follow the process under the heading 'Installing Jupyter using Anaconda and conda'. 


After you are done installing, you can see if everything went right by opening command prompt in Windows and typing jupyter notebook in the command prompt. It will open a browser tab appearing like one below:


It might take a little time to open the browser tab so have a bit of patience. In the next post, we will review some basic concepts in Python that are later required for Data Science & Machine Learning.
Share:

Contact Me

Name

Email *

Message *

Popular Posts