
Hi friends,
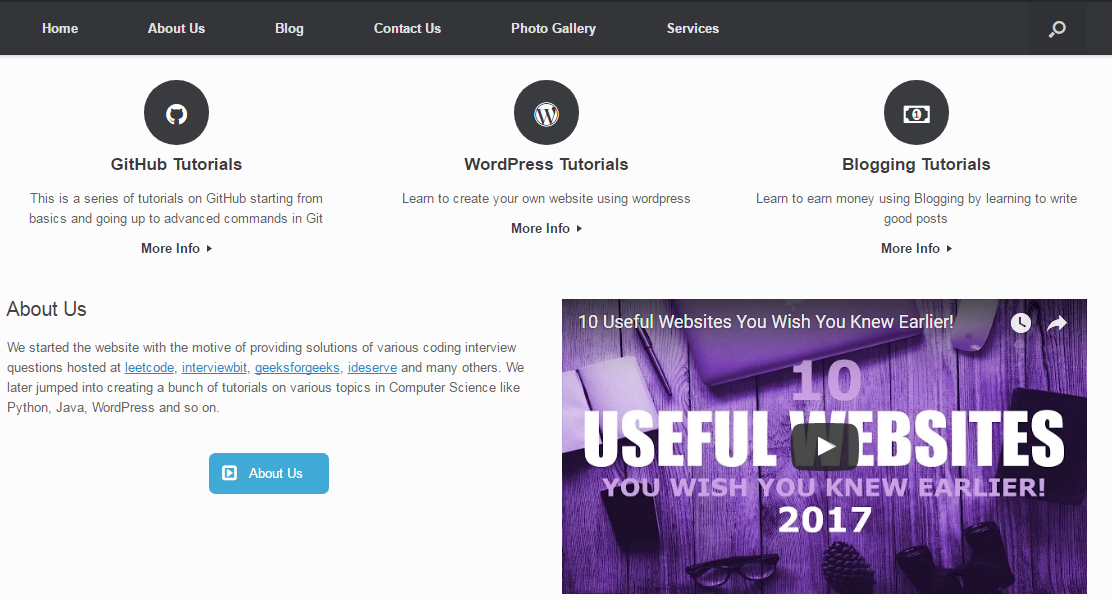
In the previous post under Creating WordPress(WP) Website tutorials, we added various important pages to our WP website. In this post, we will learn to add the most important page i.e. the Home Page to our WP website. The Home Page is the page where the user lands by opening your website link. This is the current Home Page of our WP website:

To go to the Home Page, open the Dashboard of the website, hover over the Appearance Link and click Home Page link as shown by the below image:

There might be some already existing contents available on our Home Page which we don't need. So we now delete those contents present on the Home Page by clicking on the Delete this row button available under the Settings icon beside each content as shown below:

Apply the above action for each of the content present on your website's Home Page.
Now, we add several rows to add contents to our Home Page. Click on Add Row button available on the same page as shown in the below figure:


Add two more rows in the same manner with Set Row Layout values as 3 and 2 respectively. After adding the three rows, the page will appear something like shown below:

Now, will add widgets to the rows. To do so, select the first row by clicking on it and then click Add Widget button present on the left of the Add Row button. This will open a popup with a list of widgets to add from. Add the Vantage Headline Widget to the first row and click on Edit button shown by the below image to edit the Headline. Next, add the Headline and click Done button on the popup that appears.

Next, we will add the Circle Icon to each of the items of the second row. Apply the same steps as above and add the Circle Icon to each item of the second row.
Now, click on Edit of the first Circle Icon of the second row and add the following contents:


After editing the contents, click Done followed by Save Home Page and then go to the Home Page to see the changes. It will appear something as below:

Clicking on More Info link in the above page will take you to the Services page of our website. If it does not, then you need to make the following settings to your website. Go to the Dashboard, hover over the Settings link and click on Permalinks link.

Select the Post name radio button and click Save Changes.

Now, refresh the Home Page and again click More Info link as done above. This should now open the Services page of your website.
Do the same thing for the other two Circle Icons as well.
Now, we will edit the third row of our Home Page. We'll add a text post along with a button and a video on our Home Page. To add the text post, select the first part of the third row and click Add Widget and add a Text Widget followed by the SiteOrigin button. It should appear like the one below:

Next, click on Edit button over the Text widget and add some contents to the text widget. Do the same for the SiteOrigin button as well and customize the button as you like based on the options available. After the update, your Home Page should look something like the image below:

Next, we'll learn to add a video to our website. To do so, add the SiteOrigin Slider widget to the right portion of the third row and click Edit. In the popup window, click on Add button under the Slider frames label followed by the little drop down arrow icon shown as in the below image:

Next, click the Add button under the Background videos label and again click the drop down arrow icon present beside the Video label. You can add a video either by uploading from your system or by providing a URL. I have added a youtube video on my website. Once, you have added the video, click Done followed by Save Home Page.
If you refresh the Home Page again, Voila!, you'll see a video added to your website.

Now, we'll add the Social Media widget at the footer of our website. We have already seen how to install the Social Media plugin in our website in this post. To add a widget, go to the Dashboard followed by Widgets under the Appearance link present on the Dashboard page. Scroll down on the Widgets page and click on Social Media Widget and select Footer and then click Add Widget button.

Next, click on Social Networking and add the appropriate links for the various social media websites and click Save.

If we again refresh our website Home Page (or any other page), we can see the various social media icons present at the footer of our website.

With this, we also end this post here about Adding the Home Page to our WP website. In the next post, we will learn how to change the logo and slider image of our website.

To go to the Home Page, open the Dashboard of the website, hover over the Appearance Link and click Home Page link as shown by the below image:

There might be some already existing contents available on our Home Page which we don't need. So we now delete those contents present on the Home Page by clicking on the Delete this row button available under the Settings icon beside each content as shown below:

Apply the above action for each of the content present on your website's Home Page.
Now, we add several rows to add contents to our Home Page. Click on Add Row button available on the same page as shown in the below figure:

Add a row by setting Set Row Layout value as 1 and clicking the Insert button available at the bottom right as shown below:

Add two more rows in the same manner with Set Row Layout values as 3 and 2 respectively. After adding the three rows, the page will appear something like shown below:

Now, will add widgets to the rows. To do so, select the first row by clicking on it and then click Add Widget button present on the left of the Add Row button. This will open a popup with a list of widgets to add from. Add the Vantage Headline Widget to the first row and click on Edit button shown by the below image to edit the Headline. Next, add the Headline and click Done button on the popup that appears.

Next, we will add the Circle Icon to each of the items of the second row. Apply the same steps as above and add the Circle Icon to each item of the second row.
Now, click on Edit of the first Circle Icon of the second row and add the following contents:
- Enter Title
- Enter Text
- Change Icon to whatever you like
- More URL (/services for now)


After editing the contents, click Done followed by Save Home Page and then go to the Home Page to see the changes. It will appear something as below:

Clicking on More Info link in the above page will take you to the Services page of our website. If it does not, then you need to make the following settings to your website. Go to the Dashboard, hover over the Settings link and click on Permalinks link.


Now, refresh the Home Page and again click More Info link as done above. This should now open the Services page of your website.
Do the same thing for the other two Circle Icons as well.
Now, we will edit the third row of our Home Page. We'll add a text post along with a button and a video on our Home Page. To add the text post, select the first part of the third row and click Add Widget and add a Text Widget followed by the SiteOrigin button. It should appear like the one below:

Next, click on Edit button over the Text widget and add some contents to the text widget. Do the same for the SiteOrigin button as well and customize the button as you like based on the options available. After the update, your Home Page should look something like the image below:

Next, we'll learn to add a video to our website. To do so, add the SiteOrigin Slider widget to the right portion of the third row and click Edit. In the popup window, click on Add button under the Slider frames label followed by the little drop down arrow icon shown as in the below image:

Next, click the Add button under the Background videos label and again click the drop down arrow icon present beside the Video label. You can add a video either by uploading from your system or by providing a URL. I have added a youtube video on my website. Once, you have added the video, click Done followed by Save Home Page.
If you refresh the Home Page again, Voila!, you'll see a video added to your website.
Now, we'll add the Social Media widget at the footer of our website. We have already seen how to install the Social Media plugin in our website in this post. To add a widget, go to the Dashboard followed by Widgets under the Appearance link present on the Dashboard page. Scroll down on the Widgets page and click on Social Media Widget and select Footer and then click Add Widget button.

Next, click on Social Networking and add the appropriate links for the various social media websites and click Save.


With this, we also end this post here about Adding the Home Page to our WP website. In the next post, we will learn how to change the logo and slider image of our website.

0 comments:
Post a Comment