Showing posts with label numpy. Show all posts

Saturday, 19 August 2017

Xtensor & Xtensor-blas Library - Numpy for C++

Xtensor & Xtensor-blas Library - Numpy for C++

Intro - What & Why?

I am currently working on my own deep learning & optimization library in C++, for my research in Data Science and Analytics Course at Maynooth University, Ireland. While searching for an existing tensor library (eigen/armadillo/trilinos - do not support tensors). I discovered Xtensor and Xtensor-blas, which has syntax like numpy and is avaliable for for C++ and Python.

Capabilities/Advantages (Xtensor to Numpy cheatsheet)

  • Numpy Like Syntax

    typedef xt::xarray<double> dtensor;
    
    dtensor arr1 {{1.0, 2.0, 3.0},   {2.0, 5.0, 7.0},   {2.0, 5.0, 7.0}}; // 2d array of double
    
    dtensor arr2 {5.0, 6.0, 7.0}; // 1d array of doubles
    
    cout << arr2 << "\n"; // outputs : {5.0, 6.0, 7.0}
  • Intuitive Syntax For Operation

    typedef xt::xarray<double> dtensor;
    
    dtensor arr1 {{1.0, 2.0, 3.0},   {2.0, 5.0, 7.0},   {2.0, 5.0, 7.0}}; // 2d array of double
    
    dtensor arr2 {5.0, 6.0, 7.0}; // 1d array of doubles
    
    cout << arr2 << "\n"; // outputs : {5.0, 6.0, 7.0}
    
    // Reshape
    arr1.reshape({1, 9});
    arr2.reshape({1,9});
    cout << arr1 << "\n"; // outputs : {1.0, 2.0, 3.0, 2.0, 5.0, 7.0, 2.0, 3.0, 7.0}
    
    // Addition, Subtraction, Multiplication, Division
    dtensor arr3 = arr1 + arr2;
    dtensor arr3 = arr1 - arr2;
    dtensor arr3 = arr1 * arr2;
    dtensor arr3 = arr1 / arr2;
    
    // Logical Operations
    dtensor filtered_out = xt::where(a > 5, a, b);
    dtensor var = xt::where(a > 5);
    dtensor logical_and = a && b;
    dtensor var = xt::equal(a, b);
    
    // Random numbers
    dtensor random_seed = xt::random::seed(0);
    dtensor random_ints = xt::random::randint<int>({10, 10});
    
    // Basic operations
    dtensor summation_of_a = xt::sum(a);
    dtensor mean = xt::mean(a);
    dtensor abs_vals = xt::abs(a);
    dtensor clipped_vals = xt::clip(a, min, max);
    
    // Exponential & Power Functions
    dtensor exp_of_a = xt::exp(a);
    dtensor log_of_a = xt::log(a);
    dtensor a_raise_to_b = xt::pow(a, b);
  • Easy Linear Algebra

    // Vector product
    dtensor dot_product = xt::linalg::dot(a, b)
    dtensor outer_product = xt::linalg::outer(a, b)
    
    // Inverse & solving system of equation
    xt::linalg::inv(a)
    xt::linalg::pinv(a)
    xt::linalg::solve(A, b)
    xt::linalg::lstsq(A, b)
    
    // Decomposition
    dtensor SVD_of_a = xt::linalg::svd(a)
    
    // Norms & determinants
    dtensor matrix_norm = xt::linalg::norm(a, 2)
    dtensor matrix_determinant = xt::linalg::det(a)

Installation

  • Install Xtensor
    cd ~ ; git clone https://github.com/QuantStack/xtensor
    cd xtensor; mkdir build && cd build;
    cmake -DBUILD_TESTS=ON -DDOWNLOAD_GTEST=ON ..
    make
    sudo make install
  • Install xtensor-blas
    cd ~ ; git clone https://github.com/QuantStack/xtensor-blas
    cd xtensor-blas; mkdir build && cd build;
    cmake ..
    make
    sudo make install

Use In Your Code

  • It is a header only library
    
    #include <xtensor/xarray.hpp>
    
    
    #include <xtensor/xio.hpp>
    
    
    #include <xtensor/xtensor.hpp>
    
  • Linking & Compilation flags
    g++ -std=c++14 ./myprog.cpp -lblas

Where have I used it?

As mentioned in the intro, Xtensor and Xtensor-blas are the core component on which I have built my own deep learning & optimization library. This library is a monumental shift in C++ and ease of computation. In upcoming series of posts I will show you how to create your own library using xtensor.

Next Post

In the next post, I will give an overview of the architecture of the project for your own library. And alongside I will introduce blas routines.
Share:

Friday, 21 July 2017

Data Science & Machine Learning - 3.5 NumPy Array Methods

Hi friends,

Welcome to another NumPy tutorial under Data Science & Machine Learning. In the previous post, we discussed several ways to index NumPy Arrays and Conditional Selection in NumPy Arrays. In this post, we will learn several operations that we can perform on NumPy Arrays. We will also see various methods supported by the NumPy library to deal with NumPy Arrays.

Note: All the commands discussed below are run in the Jupyter Notebook environment. See this post on Jupyter Notebook to know about it in detail.


NumPy Array Methods

So, let's first declare a NumPy Array using the NumPy's arange() function:


  1. We can add/subtract a scalar to the NumPy Array:


  2. We can multiply/divide a scalar to the NumPy Array:


We can perform the same operations among the NumPy Arrays as well.
  1. Addition/Subtraction between two NumPy Arrays:


  2. Multiplication/Division between two NumPy arrays:


Notice the warning generated due to division by zero operation. However, the division was successful and the output was inf (for 1/0).

We can also perform exponentiation operation using the ** operator in Python. Here is the operation for raising each element of the NumPy Array to the power of 3:


Now, we see some useful methods supported by NumPy library for NumPy arrays:
  1. sqrt() - This method finds the square root of each element of a NumPy array


  2. max() - This returns the maximum element in a NumPy Array
  3. min() - Returns the minimum element of a NumPy Array


  4. Trigonometric functions - NumPy also supports trigonometric methods like sin(), cos() and tan()


      1. mean() - Returns the mean of a NumPy Array
      2. log() - Performs the natural logarithm of each element of a NumPy Array


        Notice, there is a warning since logarithm of zero does not exist.
      You can visit this link to know the list of all the functions supported over NumPy arrays by the NumPy library. 

      From the next post, we'll start with Pandas, another very important library for Data Science under Data Science & Machine Learning.
      Share:

      Thursday, 20 July 2017

      Data Science & Machine Learning Cheat Sheet

      Data Science & Machine Learning Cheat Sheet


      1. NumPy


      2. Pandas


      Source — https://www.datacamp.com/community/blog/python-pandas-cheat-sheet/#gs.KQOXkLU


      Source — https://www.datacamp.com/community/blog/pandas-cheat-sheet-python#gs.lfJBxWo

      3. Scipy


      4. Matplotlib


      5. Scikit-learn


       6. Neural Networks Zoo

      7. PySpark


      8. R Studio (dplyr and tidyr)


      9.     Keras


      Share:

      Data Science & Machine Learning - 3.4 NumPy Array Indexing

      Hi friends,

      In the previous post under Data Science & Machine Learning, we discussed various ways to generate NumPy Arrays of random numbers. In this post, we will learn about Array Indexing of NumPy Arrays. This is quite similar to accessing general lists or strings in Python. 

      Note: All the commands discussed below are run in the Jupyter Notebook environment. See this post on Jupyter Notebook to know about it in detail.


      NumPy Array Indexing

      So, let's begin to see how we can do indexing of NumPy arrays.

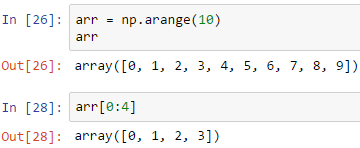
      First, let's declare a NumPy array of integers from 1 to 9 using the NumPy's arange() function.


      As I mentioned earlier, array indexing of NumPy arrays is just like indexing lists in Python. Just like Python lists, the index starts from zero and goes up to 1 less than the size of the array here too. So, to access the fifth element of the above NumPy array, we execute the following command:


      We can see that starting the index from zero (0), the fifth element is at index 4 and the element is 4.

      We can also use the slice notation with NumPy Arrays just like we do with Python lists and strings. To access the first four elements of the NumPy Array, execute the following command:


      We can also access elements which are only at the middle, say, from elements 3rd to 5th. To do so, use the following command:


      If we don't specify the starting index, then it starts with the first element by default.


      Note: The end index is exclusive i.e. it does not include the 7th element in the sliced result.

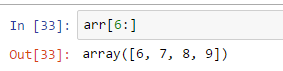
      Similarly, if we don't specify the end element, then it goes up to the last element from the starting index.


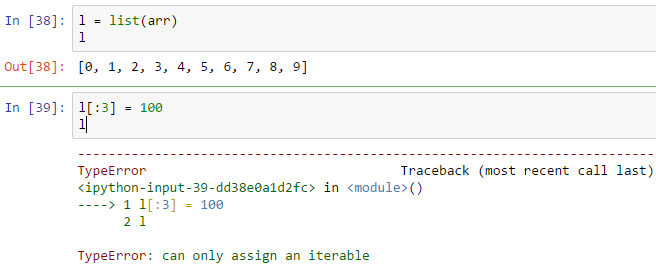
      The advantage to NumPy Arrays over Python lists is that it allows us to update multiple elements of the NumPy array all at once. For example, if we want to update the first three elements of the above NumPy Array to say 100, we can do so using the following command:


      However, doing the same with Python lists generates the following error:


      This is just a small example which shows the advantage of using NumPy Arrays over Python lists.

      Let's now see 
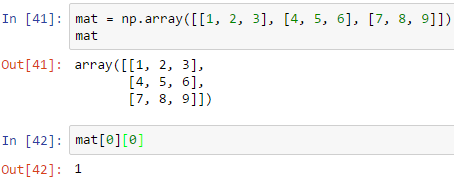
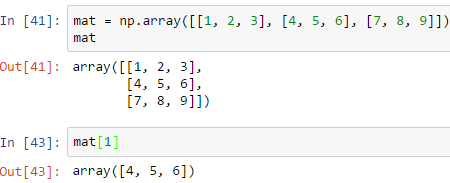
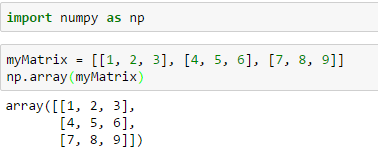
Indexing of NumPy Matrices (2-D arrays). So, let's first declare a 2-D NumPy array.


      This is also similar to the indexing of Python 2-D lists. For example, to access the element present in the first row and first column, run the following command:


      We can also just index an entire row of the matrix. For example, to get the second row of the matrix, run the following command:


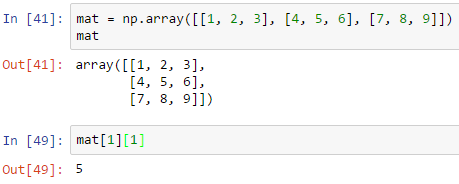
      To access the element 5, which is present in the second row and second column, we run the following command:


      Note that we mentioned mat[1][1] and not mat[2][2] since the index starts with 0.

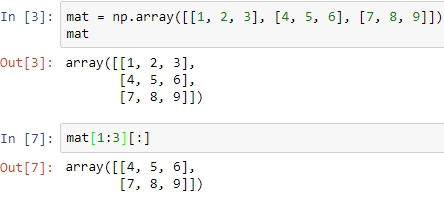
      You can use the slice notation for the matrices as well to grab a bunch of elements from the matrix. For example, to access both the second and third columns completely, we can do something like below:


      Note that we have put 1:3 and not 1:2 for the rows since we know that the end index is exclusive. So, putting 1:2 will only give the second row or the row at index 1.


      Slice notation may appear tricky at first use so I recommend to think of different elements of the above matrix and try to write slice notation to access them. With practice, you'll start to find it easier soon enough.

      Now, we will learn to access the elements of the array based on condition which is also called Conditional Selection i.e. select only those elements of the array for which the condition(s) is met.

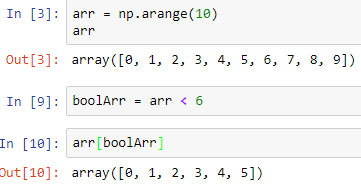
      Let's see an example. We'll use the same 1-D array we declared earlier for understanding conditional selection:


      Now, suppose we want to select only those elements of the array which are less than 6. So, how do we do it? That's where Conditional Selection comes into the picture. 

      Executing the following statement returns a boolean array equal to the size of original array with values as True/False based the condition:


      We see from the above image that the first six elements are True since the value of those elements is less than 6. 

      Now, we can use the result of this boolean array to filter elements of the array satisfying the condition that the array element is less than 6.


      Similarly, we can also obtain the elements of the array which are even using the following commands:


      We can also add a scalar to the elements satisfying the condition. For example, if want to add 5 to all the even integers of the above array, we run the following instructions:


      Notice that the even values have got 5 added to them now.

      We now end this post here on NumPy Array Indexing. In the next post, we will discuss a list of important methods supported by NumPy Arrays.
      Share:

      Wednesday, 19 July 2017

      Data Science & Machine Learning - 3.3 NumPy & Random Arrays

      Hi friends,

      In the previous post under Data Science & Machine Learning, we discussed various ways to create NumPy Arrays using the NumPy library in Python. In this post, we'll see several ways to create NumPy arrays of random numbers. So, let's see some of the NumPy methods to generate random values.

      Note: All the commands discussed below are run in the Jupyter Notebook environment. See this post on Jupyter Notebook to know about it in detail.

      Also, do remember to import the NumPy library before executing the commands.

      NumPy & Random Arrays

      1. Using NumPy's rand() function: It generates a list of random numbers following the uniform distribution over 0 to 1. So, if we want a NumPy array of ten uniformly distributed random variables between 0 to 1, we do the following:


      2. We can also generate a 2-D vector by passing two integers to the rand() function as shown below:


      3. Using NumPy's randn() function: To generate the list of random variables following the standard normal distribution, use the NumPy's randn() method:


      4. The above result represents five random numbers following standard normal distribution centered around zero. Passing the two parameters similar to above will generate a 2-D vector of required dimensions. 

      5. Using NumPy's randint() function: The randint() method generates an NumPy Array of random integers within the given range. It takes three integers as input, namely, the start point, the end point and the number of random integers to be generated. Here is a usage of the same:


      6. The above method generates five random integers in the range 1 to 20, with 1 being inclusive and 20 exclusive. Further, without the third parameter, it generates only a single integer in the given range.


      These are the standard ways to generate random numbers using the NumPy library. However, there are many more ways to generate random arrays which you can check out by pressing the Tab key after typing np.random.r.


      With this, we also end this post here on generating NumPy Arrays with random numbers. In the next post, we will learn various ways to index NumPy arrays
      Share:

      Tuesday, 18 July 2017

      Data Science & Machine Learning - 3.2 NumPy & NumPy Arrays

      Hi friends,

      In this post under Data Science & Machine Learning, we'll learn about NumPy Arrays. NumPy Arrays are one of the prominent reasons why NumPy library is so popular for Data Science. In this post, we'll see various ways to create and use NumPy arrays. As already discussed in the previous post, NumPy Arrays support two ways of usage i.e. as Vectors and Matrices. There are various ways to create a NumPy Arrays such as from python lists and NumPy's own built-in functions.

      Note: All the commands discussed below are run in the Jupyter Notebook environment. See this post on Jupyter Notebook to know about it in detail.

      Before we can begin to use the NumPy library, we need to import NumPy library in our script using the following command:

      import numpy as np

      Note: We write as np to avoid typing numpy every time we need to call its library functions.

      NumPy & NumPy Arrays

      We now see various ways to create NumPy arrays in detail.
      1. From Python Lists - NumPy supports array method to convert Python lists to NumPy Arrays. Below is an example which converts the Python list, myList, to a NumPy Array:

      2. NumPy's array() function allows us to cast any Python list to a NumPy Array. We can do the same for nested lists as well. 


      3. Using arange() function - NumPy supports arange() method to create NumPy arrays. It is similar to the range function in Python.  Here is an example for the same.


        1. Note that the arange() function creates a 1-D array by default. We can also change the step size in the arange() function just like in the range() function in Python. 

        2. Using zeros() and ones() - These methods supported by NumPy allow users to create NumPy Arrays filled with zeros and ones respectively. Both of these take a list as integers having number of rows and number of columns as the list elements. However, these also accept a single integer as parameter in which case, the column size is defaulted to 1.  Here are a few examples for the same.


        3. Generating constant arrays - NumPy library provides a method named full that allows users to create a constant NumPy array filled with a user defined value. The below example creates a 5x3 size NumPy array with value 7.

        That's it for this post friends. In the next post, we'll see various NumPy methods to generate NumPy Arrays of random numbers which will be important for working on later to perform data analysis tasks.
        Share:

        Contact Me

        Name

        Email *

        Message *

        Popular Posts